How to create a slideshow using AVS Video Editor?
If you need to create a presentation out of your digital photos or just want to make their showing more expressive, use our AVS Video Editor which allows you to create a slideshow with different transitions between images, your own subtitles or voice comments, video effects and a soundtrack.
First of all you will need to import your photo collection and additional media files (for example video fragments or an audio track that will be used as background music) into the program and add your files to the Timeline/Storyboard area. Then follow this guide steps.
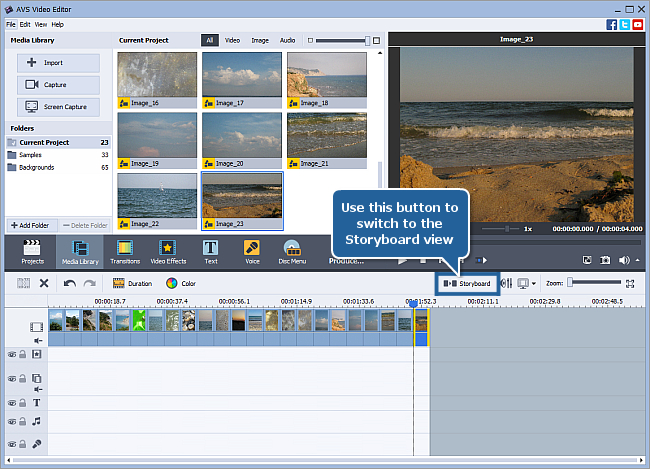
 Press the Storyboard button on the Timeline Toolbar to switch to the Storyboard view that represents the sequence of your added photos.
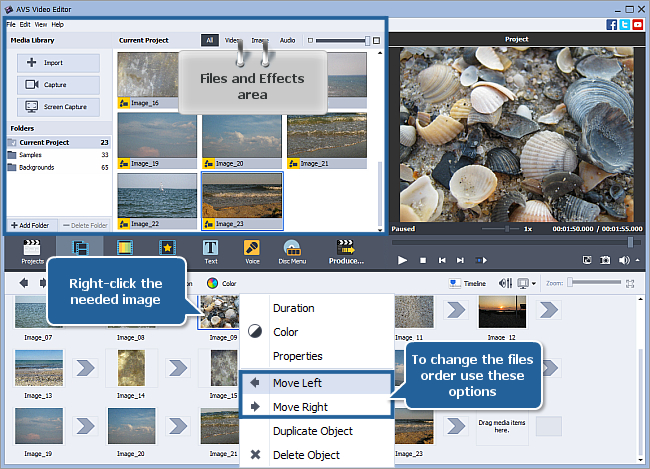
To change the images order right-click one of the images on the Storyboard and use the Move Left / Move Right options from the express menu.
 Note
Note: in the
Files and Effects area you can rotate your photos right-clicking them and selecting the
Rotate Clockwise or
Rotate Counterclockwise option from the express menu. When you use this option a new rotated image will be created in the
Files and Effects area but the photo added to the
Storyboard will not change. You will need to add the rotated image to the
Storyboard manually.
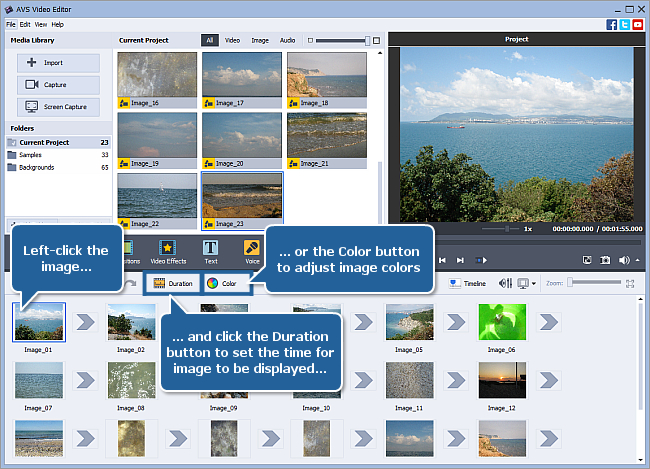
Set the length of time that each photo will be displayed on the screen. Select the needed image and click the Duration button on the Storyboard Toolbar. In the opened Duration window input the needed value and click OK.
 Note
Note: if you want to set the same duration for all the images in the slideshow, you can do it BEFORE you add them to the
Timeline/Storyboard area using the
Settings window. Select the
Settings... option from the
Edit section of the
Top Menu. In the appeared
Settings window open the
Edit tab and set the needed value in the
Image/color box of the
Default durations section.
If you need to adjust the image brightness, contrast or some other parameters select the needed image on the Storyboard and press the Color button on the Storyboard Toolbar to open the Color Corrections window. To learn more about all the available settings please refer to our online help page.
[Back to the Top]
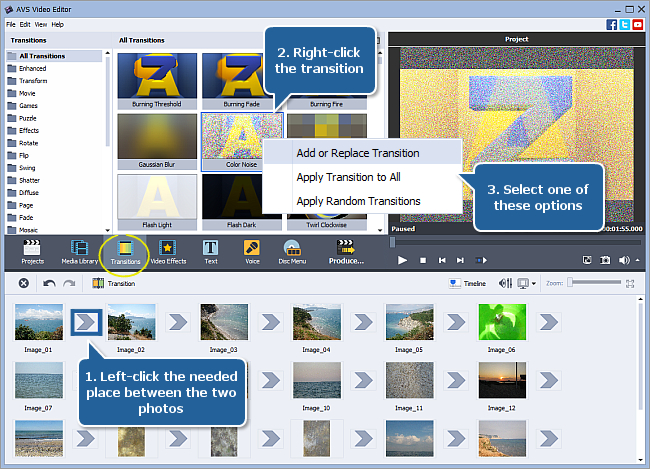
In the Storyboard view press the Transitions central button. All the available transitions will be displayed in the Files and Effects area. They are also sorted by categories on the left side of the program window.
To add some particular transitions first select the place between two images on the Storyboard where you want a transition to be added, then right-click the transitions in the Files and Effects area and add them one by one with the help of Add or Replace Transition option.
To use one and the same transition between all your photos select the Apply Transition to All option from the express menu. To apply transitions randomly use the Apply Random Transitions option.
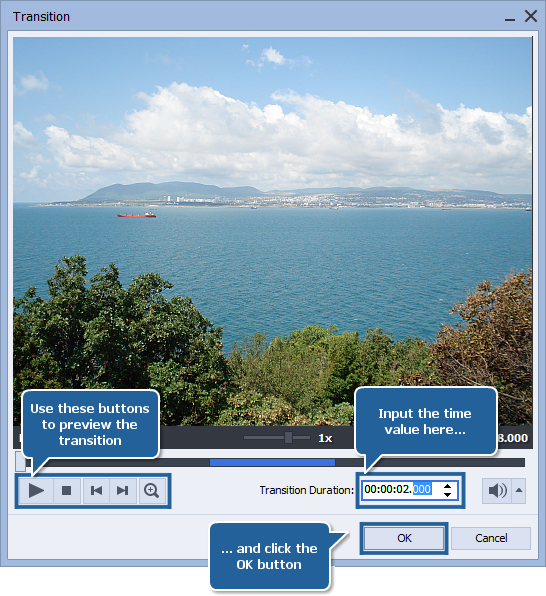
Adjust the transition duration by selecting the needed transition on the Storyboard and clicking the Transition button on the Storyboard Toolbar. In the opened Transition window input the needed value in the Transition Duration field and click OK. In this window you can also preview the selected transition.
[Back to the Top]
 Press the Timeline button to switch to the Timeline view.
Click the Text central button. Select the desired text preset from the Files and Effects area. Drag and drop the selected preset to the text effects line of the Timeline.
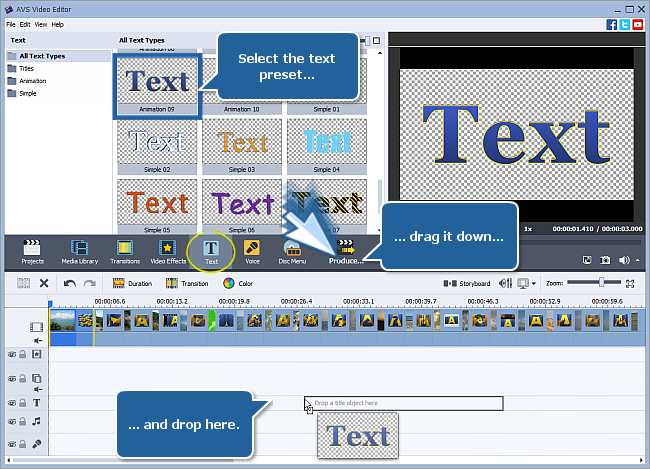
To adjust the text duration left-click one of the text block borders with the yellow stripes and without releasing the left mouse button drag it to the needed position. Double-click the text block to open the text properties window. In the preview area of the opened window double-click the default text and input your own one.
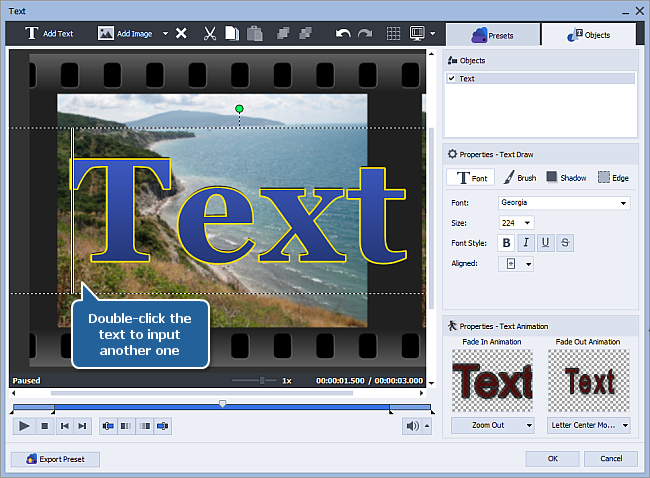
To learn more about the text adjustments see the online help page.
You can also apply video effects to your slideshow. To learn how to do that please refer to our guide.
[Back to the Top]
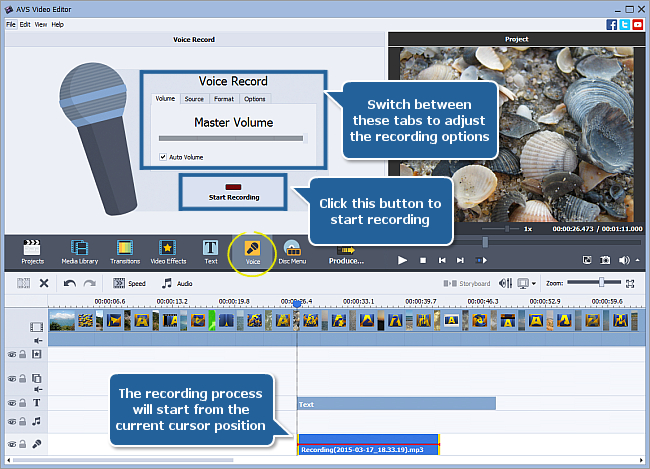
If you want to add voice commentaries to any of your pictures click the Voice central button. Make sure that the microphone is connected to your PC sound card. Set the recording options in the Voice Record panel, put the timeline cursor to the needed place on the Timeline and click the Start Recording button. The button will change to the the Stop Recording button. Click it to stop the recording process.
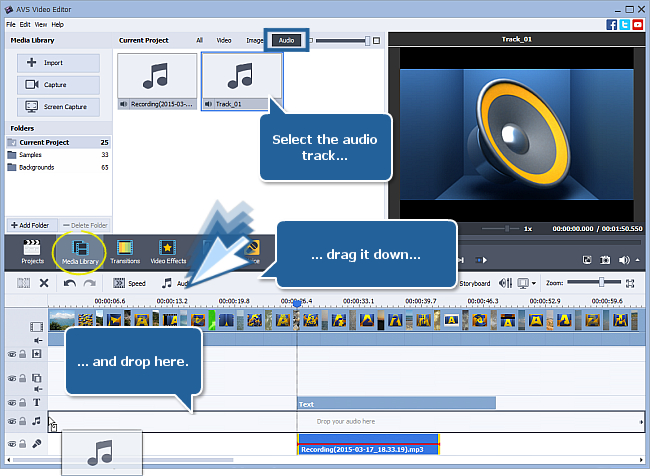
To add an audio track as background music click the Media Library central button and select the Audio category at the top of the interface. Drag-and-drop one of the previously imported tracks from the Files and Effects area to the line for audio mix of the Timeline.
[Back to the Top]
If you intend to create your slideshow in the DVD or Blu-ray formats, you can additionally make a disc menu for it. Click the Disc Menu central button. Make sure that the Disc Menu Enabled option is checked. Double-click the desired menu style preset in the Files and Effects area to apply it to the slideshow.
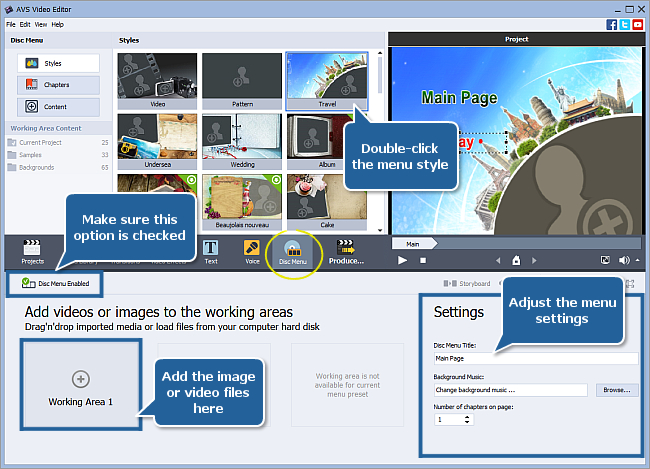
Drag and drop images or videos from the Files and Effects area to the available Working Areas at the bottom part of the program window. Select the Disc Menu Title, change Background Music or set the Number of chapters on page in the appropriate boxes of the Settings section.
You can also split your slideshow into thematic chapters. To add a chapter click the Chapters button on the left side of the program window, put the timeline cursor to the needed place on the Timeline and click the Add button on the Timeline Toolbar.
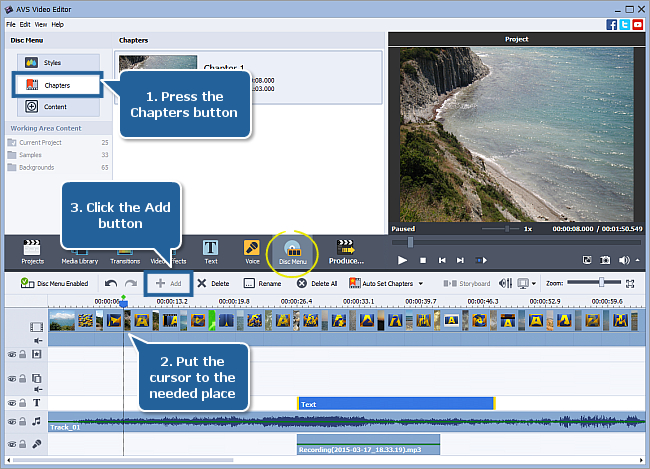
To preview your created menu return to the Styles view mode and use the Preview Area controls.
[Back to the Top]
Finally save your slideshow to a format that suites your needs best.
[Back to the Top]
Version: 9.1.1.336Size: 155.45 MBPlatforms: Windows 10, 8.1, 8, 7, XP, 2003, Vista
(no Mac OS/Linux support)
Download
AVS Video Editor
Registration on AVS4YOU is like buying a single product listed on
www.AVS4YOU.com and getting all other products from our site as a gift. That means you can install and use
ALL OTHER software with the same serial number without additional fees and limitations.
Please note that AVS4YOU programs do not allow you to copy protected material. You may use this software in copying material in which you own the copyright or have obtained permission to copy from the copyright owner.
By using our services, you agree to our use of cookies.